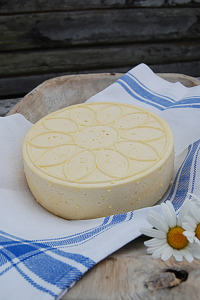
Making cheese is an art, an art you can never perfect!
– Tin Gumuns
Karl-Tövåsen’s shieling, Rättvik.
Making a safe and tasty cheese
Historically, basically all cheeses were made from skimmed milk. That is, the precious cream was removed and turned into butter. The fat contains a lot of flavours but also a lot of lactic acid bacteria. What’s that, you ask? It’s bacteria that we need to stay healthy. We have them on the body and in the body. In the past, the flora of lactic acid bacteria was much more abundant. One reason for this is that detergents and other chemical products were not used. All cows were hand-milked and the animals ate hay from the meadows instead of, for example, hay silage.
Lactic acid bacteria are crucial if you want your cheese to turn out good. There are different ways to measure how much lactic acid bacteria you have in your milk, but we won’t get into that here. What the lactic acid bacteria do is feed on the lactose in the cheese, thereby helping to lower the pH value. A clean and healthy milk has an initial pH value of between 6.5–6.8.
When the acidification process is complete after 24 hours, the pH value of the cheese should not exceed 5.3. All cheeses have their individual optimal final pH value. But none should be above 5.3.
What happens when the pH is lowered is that any bad bacteria have a much poorer environment to live in and are “driven out”. The best way to know the success of your cheesemaking is to measure the ph after 24 hours with a ph meter or ph sticks.
There can be a lot of bad bacteria in milk that you can’t see with your eyes. A safe and easy way to detect them is by CMT (California Mastitis Test). Available at Granngården. It’s also important to maintain good hygiene during milking. If the cheese is going to be sold, it is also required by law to submit cheese samples, water samples, write cheese making reports, etc.
There are two types of lactic acid bacteria. The ones we mainly have in Sweden is fil, also called mesofile bacteria in the context of curdling. They thrive and operate between 20–35 degrees Celsius. Then there’s the Streptococcus thermophilus which thrives and works its magic when it’s a bit warmer, at 35–55 degrees. They exist in different quantities everywhere around us. To compensate for the changes that have taken place over the years, the addition of lactic acid bacteria to the cheese has become necessary. They also add a lot of flavour to the cheese and are vital for a fine product.
You can grow your own fil and yoghurt culture for your curdling, or buy freeze-dried cultures, or buy fil and yoghurt at the store. The thing to keep in mind is to go all the way to the back of the shelf to get a fil or yoghurt with as many living cultures in it as possible. So you want a product with as recent a date as possible. After five days, the bacteria will have finished their work and will no longer be effective.
If you want to curdle a hard cheese, you need to use yoghurt culture. To get a hard cheese, you have to be able to drain out a lot of whey. This is done by breaking the cheese grains into small pieces, heating the curd to a higher temperature and stirring for a long time. Yoghurt culture likes heat so that is why it’s used here.
If you want to make a soft camembert, for example, you should use fil culture. Such a cheese is not heated to more than 35 degrees. The softness is achieved by breaking the curd to obtain large grains of cheese and stirring very little, which leaves a lot of whey in the cheese.
The lactic acid bacteria ensure that the cheese has the right acidification process. A cheese that does not have the appropriate acidification curve will become over-acidified, making it unsafe to eat, and it will not store well. You can tell if an aged cheese has acidified too much if it looks like chalk inside and has a rough surface.
When the cheese is ready, it is essential that the cheese is kept warm! Otherwise, the lactic acid bacteria fall asleep and bad cold-loving bacteria can take over. Wrap the cheese up or put it near the fireplace so it stays at 20 degrees for 24 hours. Flip the cheese at least three times during this time. This applies no matter which cheese you choose to make.
How to Make Shieling Cheese
Heat the milk to 32 degrees. Add 1% fil and 0.5% yoghurt culture. This may need to be adjusted slightly depending on what your milk contains. Let the milk sit for 30 minutes.
Then add rennet. It’s available for purchase at some stores or pharmacies. Find out the required amount per litre of milk from the label on the bottle. If you have access to industrial rennet, take about 25 ml / 100 litres.
Let the milk coagulate for about 30-45 minutes. Check the curd with a knife to see if it is ready. Different types of milk have different speeds when it comes to the rennet process.
Cut or break the curd into as even grains of cheese (corn size) as possible. With a sharp knife or thin balloon whisk if you don’t have access to a real harp. The smoother the cheese grains, the better the drainage of whey, the better the cheese. Do not crush the curd. Then lots of protein and calcium will be lost into the whey.
Then stir the curd in and start heating to 38 degrees.
If you want to make a hard cheese, the size of the grains, the movement, the ph reduction and the heating are what make the curd release the whey. If you want to store a cheese for a long time, it is the whey content of the cheese that determines how long it can be stored.
After about 1 hour of breaking the curd and stirring, the curd is usually ready for absorption. Feel the grains of cheese, they should have a rind around them. Take a handful of curd in your hand and squeeze together into a “shesmus” cheese ball. If you can then break up the cheese ball so that each cheese grain regains its structure, the curd is ready.
What you use for cheese moulds is up to you. An old cookie jar with drilled holes works well. The more holes, the easier it is for the curd to drain whey. Putting a cheesecloth (cloth diaper, sheet cloth or the like) in the mould also helps with drainage.
Scoop away some of the whey first so it is easier to scoop up the curd. Turn the cheese at least twice in the first hour to get a nice even cheese. If you want, you can add a lid and a weight to add pressure to the cheese. About 5 kg should do the trick. A bucket of warm water can be useful. It also helps keep the cheese warm. Wrap the cheese carefully so that it stays at 20 degrees for the first 24 hours. Remember to flip it! If you are planning to sell it, take a final pH value after 24 hours. The optimum is 5.2–5.3 pH but never higher. If you have a lower pH, use less lactic acid culture next time, etc.
If you are going to cook whey butter on the whey, heat it up as quickly as possible. The lactic acid bacteria continue to work in the whey and lower the pH value. If the whey becomes too sour, the whey butter becomes sour. When heated, the pH drop is interrupted.


